Design
You know how your smartphone doesn't look dated until you catch a glimpse of the next-gen model? That's exactly how I felt after seeing Nest's latest Learning Thermostat. No, it isn't a massive departure from past iterations. You'll still get that same rounded design and familiar display style, but there are a few key changes.
Now, you can choose from four different dial finishes, all for the same price: stainless steel, black, white, or copper. Nest's third-generation thermostat also boasts a 40 percent larger screen with improved resolution for better all-around visibility (specifically, the display has 229 pixels per inch, 25 percent more than its predecessor, resulting in a sharper on-screen image). Additionally, Nest has slimmed down the thermostat's profile, so it won't stick out from the wall as much.
While I instantly noticed the updated display size and resolution, the "thinner" depth was much less obvious. A side-by-side spec comparison shows that the second-gen Nest measured 3.2 inches in diameter (8.1cm) and 1.26 inches in depth (3.2cm). The new thermostat is slightly larger at 3.3 inches in diameter (8.4cm) but slimmer, with a depth of 1.21 inches (3.1cm).
The tiny 0.05-inch difference in depth doesn't make much of a visual difference, but Nest is clearly working to streamline its thermostat with each next-gen product launch.

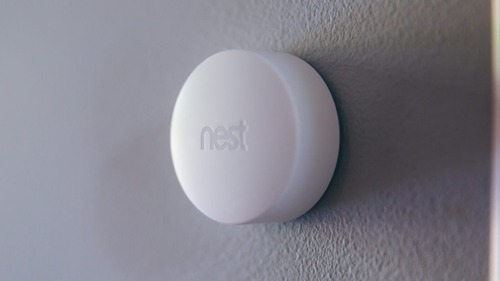
Nest temperature sensors cost $39 each, or $19 bundled with the $149 Learning Thermstat.
Features
The third-gen Nest Learning Thermostat also offers a handful of fresh features. Where previous Nest thermostats relied on near-field sensors alone (which have a roughly 3-foot range) to pick up on motion activity, this version tacks on a far-field sensor for a new function it calls Farsight. Farsight picks up your presence from farther away than earlier models, then it lets you see your thermostat's target temperature or the current time in either "analog" or digital modes from up to 20 feet away. This ensures that you can spot the time and temperature at a distance, without having to be on top of the Nest. And, thanks to the new and improved resolution and larger display, you'll actually be able to read them.
The Learning Thermostat, as well as the Nest Thermostat E , now work with Nest temperature sensors. Unlike Ecobee temperature sensors, which have proximity detectors to help determine if you're home or away, Nest's version only tracks ambient temperature. They also don't currently support voice commands, such as, "Hey, Google , what temperature is it in the kitchen?"
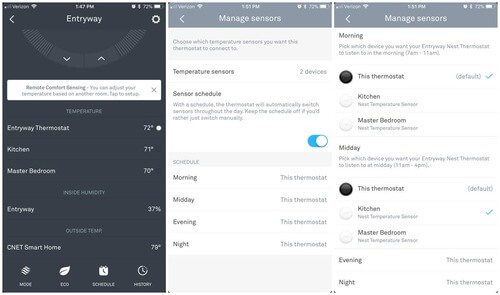
You can put up to six Nest sensors in your home and each one is powered by a single CR123 battery that's supposed to last for two years. Installation takes a few minutes -- just pull out the battery tab, enter the code on the sensor, wait for it to connect and assign it to a certain room like "Kitchen," or "Master Bedroom."
After that, you can assign one of the sensors to act as the default temperature reading from the app. You can also create custom schedules for the morning, midday, evening and night from the "Manage sensors" section in the app settings menu.
For example, if you regularly cook in the evening, stick a temperature sensor in your kitchen. Since that room/area likely gets warmer during that time, you can set the "Kitchen" sensor to be the default temperature reading between 4 and 9 p.m. every night. That way, your heating and cooling will adjust around the temperature in the kitchen, rather than the lower temperature where your thermostat is located.
Nest's Learning Thermostat also offers Family Accounts and Home/Away Assist , two new features that help improve performance. Family Accounts lets users in the same household set up their own Nest accounts (instead of the shared family accounts that the company offered previously). Once Family Accounts are created, Home/Away Assist jumps into action by tracking each person's phone location. It isn't exactly the same as geofencing, as there's no geofenced range, but it does make it even easier for Nest to keep an eye on your whereabouts.
This model also adds a function it calls Furnace Heads-Up, for those with a forced-air furnace system. Essentially, this feature keeps track of the times your forced-air furnace automatically turns off to prevent overheating. And, if it senses that there's a potential issue, it will alert you in the Nest app, on the thermostat screen and in your monthly energy usage email.

Customize your temperature sensors in the Nest app.
Performance
While there are some clear design and feature differences between this Nest and previous iterations, version 3.0's installation, Wi-Fi, app configuration, performance, and overall usability remain roughly the same.
Of course, installation will vary widely depending on your heating and cooling system, but the third-gen Nest Learning Thermostat is by far the easiest model I've ever installed. It comes with the same tiny, functional screwdriver, a built-in level, a basic rectangular baseplate for covering up any unsightly holes or patchy paintwork from previous installs, and a steel plate for mounting your thermostat to an electrical box.
It took me about 10 minutes to install my model from start to finish. Here's a quick overview of the process:
- Turn off the power running to your heating and cooling system.
- Remove your existing thermostat.
- Attach the new baseplate (optional) and thermostat base. Screw them down with the included hardware (Luckily, I already had holes that lined up with the new thermostat, which saved me some time).
- Connect the wires to their respective ports. In my case, that included Y, G, W, Rh, and C wires . Please note: Many older systems rely on a four-wire configuration—typically just a Y, G, W, and Rh or Rc—because older thermostats didn't need to power fancy LED displays. Some four-wire configurations will work with this thermostat, but consult a professional if you have any questions or concerns. Nest's four-wire setup relies on a process HVAC professionals refer to as "power stealing," which can damage your HVAC system if not done correctly. I had a second-gen Nest set up using just these four wires for years without any problems whatsoever.
- Pop on the faceplate.
- Turn the power back on. (Didn't work? Here's Nest's more in-depth installation tutorial.)
Now you're ready to configure your Nest. Your unit will power on and walk you through the process, which includes setting your language, connecting to your local Wi-Fi network, updating any out-of-date software, setting your location, answering some basic questions about your HVAC system, inputting your preferred temperature ranges for heating and cooling, and performing a quick (optional) system test.
This may sound like a lot, but you can breeze through most of it pretty quickly. If you aren't sure what sort of HVAC system you have, you can select "I don't know" and return to it later on. And if you don't already have a Nest account, you can now download the app on your Android or iOS device of choice and dive into custom preferences, such as Farsight, vacation modes, and integration with other Nest products and third-party smart devices.
The smart stuff
While the Ecobee4, the Honeywell Lyric , and the Honeywell Lyric T5 all have their own related apps and innovative smart features (Ecobee relies on a remote temperature sensor and built-in motion sensors to track your home or away status; the Honeywell Lyric and Lyric T5 use your phone's GPS location), Nest stands out with the most comprehensive smart device support among its major competitors.
This advantage is primarily due to Nest's growing range of product categories, which now includes four security cameras , a smoke and carbon monoxide detector , a lock , a doorbell , an alarm system , and two thermostats. All of these devices are accessible through the same Nest app and can be used in conjunction with each other. For instance, if a Nest Protect detects smoke or carbon monoxide, it's designed to display an alert on your Learning Thermostat's screen and shut off forced air systems (when smoke is detected) or fossil-fuel heating (when carbon monoxide is detected).
You can learn more about the specific ways Nest products work together on this support page.
Nest also integrates with Google Assistant and Amazon Alexa. To configure the Nest thermostat to work with your smart speaker of choice, simply go to the Google Home or Alexa app. Then you can issue commands like, "OK, Google/Alexa, change the entryway thermostat to 68 degrees," "OK, Google/Alexa, raise the entryway thermostat by 3 degrees," and much more. This voice control integration greatly contributes to Nest's dominance in the smart thermostat market, although it's worth noting that the Ecobee4 also works with Google Assistant, Alexa, and Siri.
Nest's Farsight feature even provides you with the weather forecast.
Conclusion
The $249 third-gen Nest Learning Thermostat is no longer the revolutionary product it was in 2011, but the Google-owned brand has managed to maintain its status as a smart climate control leader despite the rapidly changing landscape. Its support for Google Assistant and Alexa voice commands, improved design, and new features such as Farsight, Family Accounts, and Home/Away Assist only enhance its already impressive performance and ease of use through the smartly-designed Nest app.
Adding a temperature sensor to the lineup helps Nest hold its own alongside Ecobee, making the third-gen Learning Thermostat an easy recommendation, especially if you're already invested in the Nest/Google platform. Even so, the $249 Ecobee4 is still my top pick if you're in the market for a smart thermostat. It works with more smart home partners (including Apple HomeKit) and comes with a temperature sensor at no additional cost.
